Organise your channels and DMs into sections
Tidy up your channel list for easier access
HOW TO CREATE SECTIONS FOR YOUR CHANNELS AND DMs
In addition to the Starred section, you can create and name your own sections to help organise channels into useful groups.
Note: This can only be done on desktop, but sections will appear on both desktop and mobile.
To create a new section:
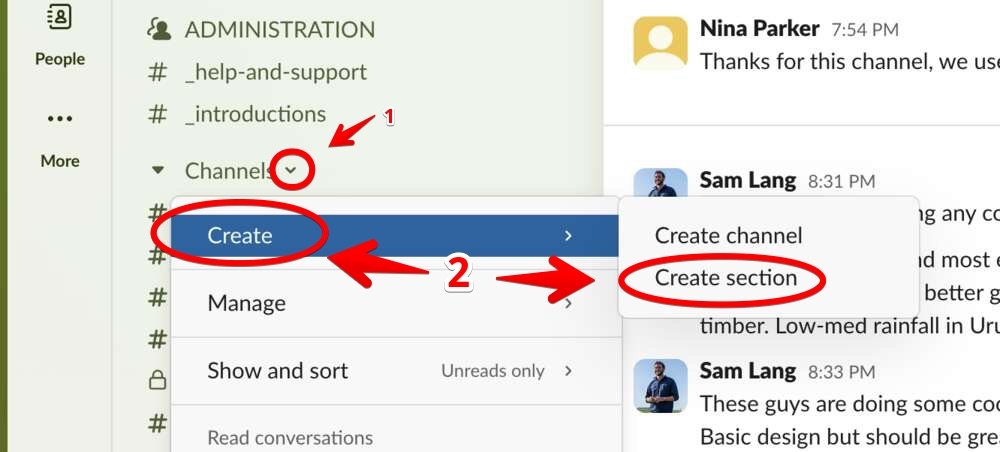
find the ‘Channels’ section heading (or DM section heading) in the left sidebar and click on the right-hand arrow
in the menu, hover over ‘Create’ and choose ‘Create section’
in the pop-up that appears:
A) enter a name for your section (you can also add emoji)
B) then click the ‘Create’ buttonNote: it can be useful to use all capitals for section names to help them stand out
HOW TO ADD CHANNELS AND DMs TO SECTIONS
New sections you have created will appear in the same list as the ‘Starred’ option.
To add a channel or DM to a section (or move it to a different section):
The simplest way is to drag and drop channels into the section headings.
Alternatively:
go into the channel and click on the channel name to open channel settings
click on the button top left showing a star
click to choose from the list of sections you’ve created
return to the homescreen and you’ll see the channel listed under that section


HOW TO MANAGE AND EDIT SECTIONS
To edit or delete a section:
find the section heading (or DM section heading) in the left sidebar and click on the right-hand arrow
in the menu that appears, hover over ‘Manage’ to open the options
rename [section name]: edit the section name
delete [section name]: delete the section (the channels will not be deleted, just returned to the general channel list)
edit all sections: this will add a checkbox against all channels in the sidebar to allow you to select many at once and add them to a new section
